Innago Help Center

Advice and answers from the Innago Team

Generic selectors
Exact matches only
Search in title
Search in content
Post Type Selectors
post
Filter by Categories
01. Getting Started with Innago / Dashboard
02. Creating and Editing Properties
03. Adding Tenants and Lease Terms
04. Adding your Bank Accounts
05. Applications and Screening
06. Uploading / Signing Leases and Documents
07. Viewing and Creating Invoices
08. Tracking Expenses
09. Tenant Communication
10. Managing Maintenance
11. Marketing your Rentals
12. Team Management
13. Viewing Reports
14. Settings
15. Tenant Management
16. Referrals and Integrations
17. Help Articles for Tenants
A. Adding and Deleting Users
A. Adding, Deleting and Archiving Properties
A. Adding, Editing and Deleting Tenants
A. Creating New Invoices
A. Customizing Application Templates
A. Learning the Basics
A. Messaging your Tenants
A. Notifications
A. Setting up a Document Template
Accelerent
B. Adding / Editing Charges and Fees
B. Adding Lease Terms
B. Creating Messaging Templates
B. Editing Property Details
B. General Settings
B. Managing User Roles
B. Online Document Signing
B. Profile
B. Requesting Applications
C. Assigning Bank Accounts to Properties
C. Editing Lease Terms
C. Late Fees
C. Notes
C. Recording Payments and Managing Invoices
C. Tenant Screening and Reports
C. Uploading and Downloading Documents
D. Applications and Screening FAQs
D. Crediting, Deleting and Exporting Invoices
D. General FAQs
D. Property Settings
D. Renewing and Terminating Leases
D. Renters Insurance
E. HOAs
E. Income FAQs
E. Instant Onboarding
E. Special Lease Scenarios / Cases
Integrations
PlacePay General FAQ's
PlacePay General FAQ’s
PlacePay Landlord
PlacePay Landlord
PlacePay Tenant
PlacePay Tenant
Uncategorized

We understand that there may be situations where the lease end date was entered incorrectly. For example, if a lease was intended to expire on June 30, but the end date in Innago was mistakenly entered as July 31, the lease will now appear as expired on July 31.

No need to worry—this can be corrected directly from your end. Simply follow the steps below to update the lease end date.

  1. Visit the Leases & Files page from the main menu on the left side of your screen. 
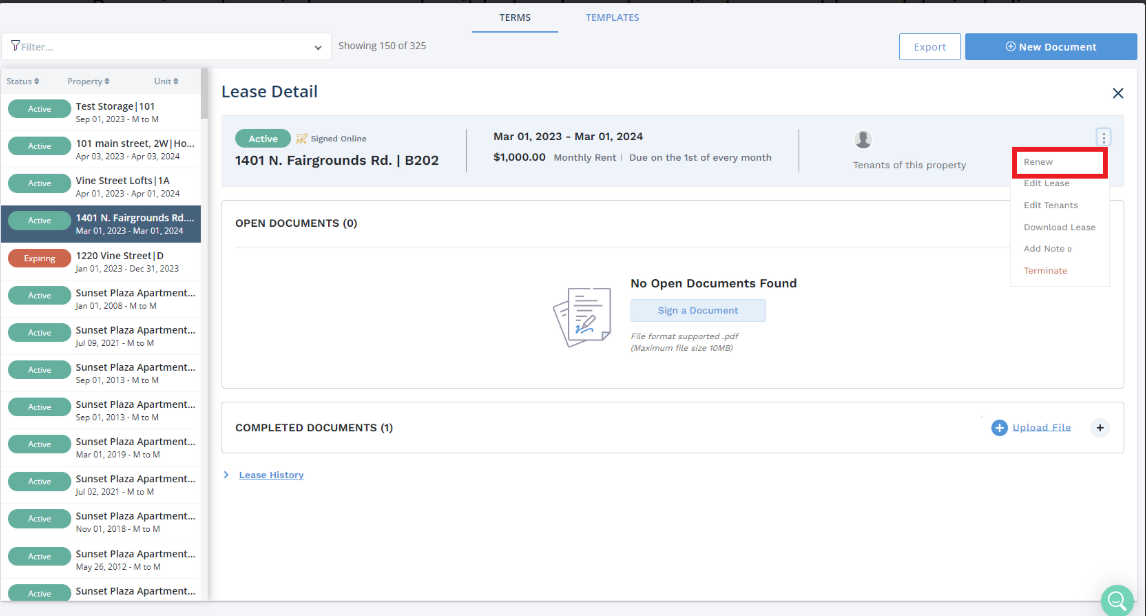
  2. Select the lease term that you’d like to renew. This will take you to the Lease Details page. 
  3. On the Lease Details page, click the three vertical dots located in the top-right corner, then select Renew.
  4. Next, choose the Renew and Extend option. Once you’re at this point, it will provide you with an option to change the end date for lease and there you can enter the end date of your choice, even a back date.
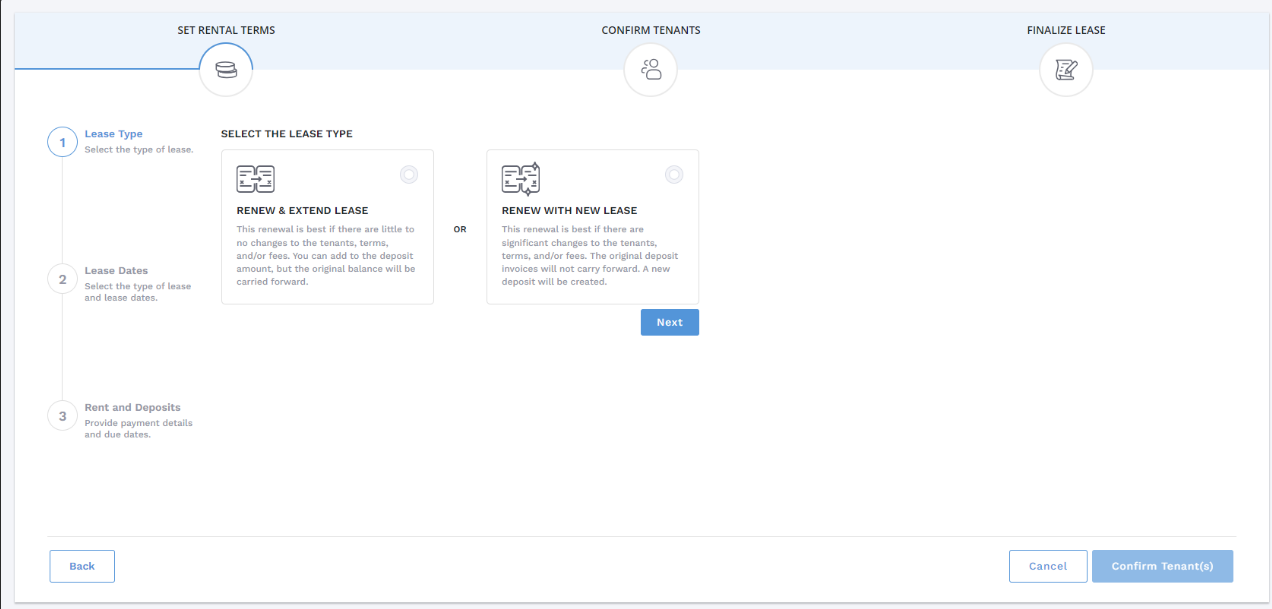
     
     
  5. Click “Confirm Tenants” and then finalize your changes on the next screen. The end date will be updated accordingly. Please note, Tenants will not be notified of these changes.